One of the most critical tasks in growing your own transplants is making sure they have consistent moisture. This can be time-consuming if you’re growing a lot of them. Not to mention occasions where one might not be able to water them as often as they would like, be on vacation, etc. This transplant tray is almost totally self-watering and self maintaining. At a set time, water is pumped from the bottom reservoir into the top tray, providing a high-enough water level to wick some of the water into the transplant containers, watering them. The water continues to be pumped into the tray for a set time until it is shut off by the timer. By then, the transplants have received enough water to moisten the soil media that they’re in. But, it’s not a favorable condition for the transplant’s soil to be constantly moist, as their roots need to “breathe”. Yes, I know… nothing can be totally self-watering and self-maintaining.
This setup does require occasional maintenance, such as replacing fresh water lost in evaporation, or that’s gotten dirty. 2 ft. 1 - low-volume fountain or other water pump.
1. Place the smaller storage container inside the larger one and mark on the outside of the larger container it where it ends. 2. Fill the top storage container with enough water to completely cover the bottom of it. Depending on the container, the depth of the water at this point shouldn’t be more than a half inch. 3. Put a mark at each of the four corners, right at the top of the water level. This is an important measurement, as it will become the overflow points. 4. Drill a 1/4″ hole at these four points. 5. Using the marks you made in Step 1, drill a 1/4″ or 3/8″ hole (depending on the diameter of the tubing you have) in the short side of the bottom container, about an inch or so below the mark. 6. Cut a hole on the short side of the bottom container, about an inch or so below the mark, on the opposite side of the hole made in Step 5. 7. Drill a similar-sized hole in the top container, in the space between the edges of the two containers. 9. Attach the tubing to the water pump (photo H). 10. Position the water pump inside the bottom container, preferably on the same side as the holes made in Steps 7 & 8. 11. 12. 13. Connect the power/extension cord to the timer, and then to the water pump (photo J). At this point, your ready to put in your transplants (photo L). This is where the “experimenting and testing” begins. 14. With the transplants in the tray, turn on the water pump until the water is draining out of the four corner overflow holes in the top tray. Then, stop the pump. Drill 4 holes in the bottom of the top tray, either in the middle or on the edges, allowing the water to completely drain out. The water should be completely drained out in a couple minutes. 15. Set the timer to only run for the smallest increment it can (mine is in 15-minute increments). 16. Let the setup run on it’s own with the timer running for a day or two. Observe the transplant’s soil carefully to see if it is being allowed to at least partially dry out. At some point you will have your setup running with the right amount of time for the transplants to get properly watered, but not overwatered.
- Longer Service Life: The blade of this round small shovel is made of carbon steel, which can effectively improve the hardness by high temperature quenching, and the surface has anti-rust coating to avoid rusting.
- Sturdy Structure: The small garden shovel with D-handle, ergonomically designed grip can increase the grip of the hand when using, the handle is made of strong fiberglass, will not bend and break under heavy pressure.
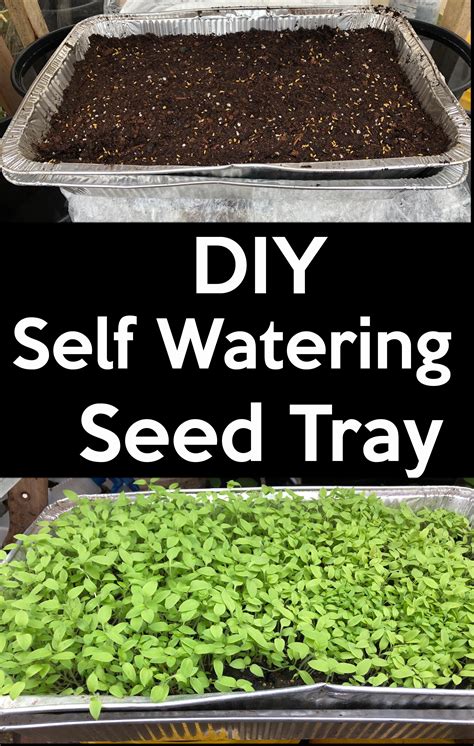
I don’t know about you, but I want a vacation and seedlings. Vacationing in a warm place when it is still cold at home is so nice. I don’t normally go on vacation, but this year I did. My goal was to have my plants “take care” of themselves while I was gone for 9 days. I love not having to water as often all of the time, not just while on vacation. Most of my plants are in a dormant phase and require little amounts of water because of the winter, so I wasn’t worried about them. I started off by making a chart and keeping track of how often I was watering all of my plants. I started this 2 weeks before leaving for vacation. The length of my vacation will be 9 days, so I needed my self-watering to last that long. Before my self-watering seedling tray, I couldn’t wait 9 days between watering. I purchased a Burpee Self-Watering Greenhouse Kit for my very first indoor seedlings several years ago, which is great at self-watering. It uses a fabric type watering mat and capillary action to wick the water up from the reservoir in the tray and up to the base of the plants. The Burpee trays are too expensive for me this year because I want 20 - 10”x20” trays. There is no way I am paying about $31 per greenhouse tray kit for all of my seedlings. Since I need more than just a few trays, this solution will save me a lot of money. My version also has a larger reservoir which holds more water.
Fabric scissors (Any nice new pair of scissors are excellent for cutting fabric. Take one of the trays and the Exacto knife. On that same tray that was just cut, add holes with an Exacto knife (if there aren’t any already) to allow water to drip through the tray. This will prevent too much standing water. I made 24 holes total in my tray, evenly spaced along the bottom. Next, I tested to be sure the holes I created allowed water to drip through. I held my tray under the kitchen faucet and observed the bottom of the tray to make sure drips were coming down from the holes. Cut the wood into 6 blocks about 2” x 1 ¼” x 1 ½”. This isn’t an exact dimension. Distribute the 6 blocks evenly close to the edges onto the tray that has not been cut. This tray will be used for holding the water. The blocks should be placed to be 1 ½” high. This should hold the top tray up 1 ½”, so that the top tray still fits down in the bottom tray a little bit. Place the water reservoir tray under the tray with the self-watering mat. There will be some extra slack in the self-watering mat. Water the mat. Place the pots into the tray. I use peat pots which absorb the water well from the self-watering mat. I assume that using soil blocks or peat pellets would work well also. There is a gap between the two trays. This makes it easy to add more water into the lower tray using a watering can. If I am just starting seeds, I cover the top with some sort of plastic, like a plastic dome. This will make sure the moisture is held in enough for the seeds to start. I was able to self-water my plants for over 2 weeks without having to do anything!
Do you use something for self-watering? What do you use? Last week, I saw the most amazing gardening trick…well, amazing to ME. A couple, who tends a garden right next to my plot, were using a homemade self-watering tray that they constructed themselves upon which to grow their seedlings. the contraption was quite simple..and I’ll explain in a minute. Apparently, they only have to water their seedlings once a week. There is a wicking effect that makes this work…all physics. The smaller piece of felt soaks up the water and wicks it towards the larger piece. So both pieces get quite wet. When seedlings are placed on the wet felt, their roots sense the moisture in the felt and reach down through the holes in the container they are in, and soak in only the amount of water they require. I wet the felt with water, poured some extra into the inverted lid and made sure the end of the felt remained in the water. Apparently, the felt will remain wet as long as it stays partly immersed in the water. Placing the whole apparatus on a table near the window sill, I put a few tomato plants on the felt and waited. After a day, I could see some roots peeking through the holes in the bottom of their containers.
Seed starting is a right of passage for most gardeners. However, there are so many different ways to do it, that it can be overwhelming! Compare the pros and cons of seven different DIY seed starting trays that you can make at home. I’ll share my experiences with all those super-adorable containers you can make at home (Part 1 - below) as well as some thoughts on the store-bought stuff (Part 2). Note: for more information on the whole process of seed starting, check out Seed Starting 101 for the basics. You absolutely, positively do not need to BUY anything to be successful at seed starting. Well, besides your seeds (if you haven’t saved your own) and some great sterilized seed starting mix, you can find most of what you need around the house. Not every oh-so-cute Pinterest-worthy repurposed container gives your seeds the best start, though. And some are just unnecessarily time-consuming for the home gardener.
These wildly popular little containers can be easily made by cutting strips of newspaper and rolling them around a small tomato paste can, glass, or a fancy-dancy pot maker to make cheap little starters. Newspaper is biodegradable, so you can plant your seedling out in the garden in the newspaper pot, and it’ll break down naturally from the bacteria and other organisms in the soil. We all use toilet paper, right? To make a toilet paper roll into a simple diy seed starting container, cut the tissue roll in half. In theory, the cardboard will break down in the soil so it can be planted out like the newspaper pots, BUT not all soil is equal. This method of seed starting works well for cuttings and seeds that may take longer than average to germinate. Egg cartons can be a good option for starting plants with shallow roots that you want to plant in a row, such as peas or lettuce. By the way, we’re talking about the cardboard variety, not styrofoam egg cartons here.
Grab a box cutter and use it to score (not cut!) a line through the middle of the divots in the carton on the bottom of each cell. When it’s time to plant, simply make a trough in the dirt and place your egg carton halves inside. These are so adorable, aren’t they? Using a cardboard egg carton filled with soil, you can find 12 little cells to start seeds. When you’re ready to plant, you can theoretically just grab one and plant it in the garden like the toilet tubes. They don’t have to be yogurt (shown here are cream cheese containers), but you get the picture. This is the equivalent of the plastic nursery cell seed pots. Just punch a few drain holes in the bottom and Bob’s your uncle. The box that you buy pre-washed baby greens in will make a lovely container, as will a chicken dome or a cake tray. Cut a few holes in the lid for ventilation and check it often to make sure seedlings don’t succumb to the dreaded “damping off,” a fungal infection that kills the seedling.
Clear plastic containers are great as a built-in greenhouse. So, most likely, you don’t have a soil-blocking tool around your home. To use this handy tool, combine your seed starting mix with water in a bucket until it’s the same texture as wet sand. Grab your soil blocking tool and press it into the wet mix. That’s my list. As you can see, making your own seed starting trays can be quite rewarding!
Please comment if there are other starter trays out there that you have used and loved or hated. I’ve tried many ways, and I have my favourite, trusted, old standby seed-starting methodology, but you will find that in Part 2 of this series. How do I water my seedlings? I recommend bottom watering your seedlings. If you water overtop, the seeds can easily be dislodged from the soil or the delicate seedlings damaged. To bottom water, fill a tray with water and place your containers in the tray. The soil will slowly drink up the water. Leave the water in the tray until the top of the soil is damp, then pour out any remaining water from the tray. How long should seedlings stay in trays? It depends on how large your seed starting containers are. If they are quite small, such as the egg carton, they should only remain in there for a week or two after sprouting. Leaving seedlings in small pots with no nutrition will cause unwanted stress to the plant. When seedlings have two true leaves, they’re ready to be transplanted into larger containers if keeping them inside or ready to move outside to harden off.