Most green thumb enthusiasts know that little greenhouses are full of potential. With the right conditions, the seedlings can grow into thriving plants, lush with produce or blossoms. Ventilation is crucial in controlling temperature, managing humidity, and ensuring a constant supply of carbon dioxide for your plants. But how do you set up the ideal ventilation for your small greenhouse?
Creating a controlled environment helps plants thrive regardless of external weather conditions. Proper ventilation is crucial in preventing the onset of common plant diseases. These diseases thrive in environments with high humidity and insufficient air circulation. The good news is that achieving optimal ventilation in your small greenhouse is attainable.
Why worry about retrofitting vents onto your greenhouse when there are options that come with vents included? You have two main ventilation systems to choose from: natural and mechanical. The natural approach relies on the wind and the principle of hot air rising to cycle fresh air into the greenhouse. It typically involves roof vents, side vents, or a combination. On the other hand, the mechanical system involves electric fans and exhaust, offering more control and precision.
Ventilation systems: natural vs mechanical
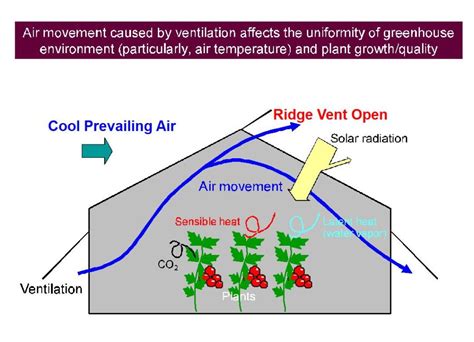
Consider placing vents on your greenhouse’s roof and sides for a natural ventilation system. Remember that warm air rises, and roof vents enable hot air to escape. On the other hand, you can place exhaust fans on one end of the greenhouse to push out the hot air for a mechanical system. On the opposite end, the intake shutters facilitate fresh air for the greenhouse.
Thermostats and hygrometers are invaluable tools for controlling your greenhouse’s climate precisely. Thermostats continuously monitor the temperature, ensuring it remains within the desired range. You can monitor and regulate the climate of your greenhouse using these devices. Hence, you can provide your plants with the ideal environment for growth and ensure their well-being. This dynamic duo becomes your greenhouse’s guardians by setting specific parameters. With the help of thermostats and hygrometers, you can ensure that your plants always stay within their optimal comfort zone.
Getting started: placement and sizing
Setting up adequate ventilation in your small greenhouse is simple. Greenhouses need good fresh air circulation. So, are you ready to provide your plants with the fresh air they need to thrive?
Greenhouse vent placement is key for maintaining comfortable temperatures. Roof vents should go along the top ridge, ensuring they can open all the way for the most air to get out. Side vents work best at the level of your benches so the fresh air hits your plants. Set up your roof and side vents on opposite sides to promote a gentle cross breeze. Make sure nothing outside, like buildings or plants, blocks them.
Figuring out the correct size for your greenhouse vents is vital to keep the air moving properly. You’ll want the total area of your vents to be around 15-20% of your greenhouse’s floor space. So, if your greenhouse is 100 square feet, for example, you’re aiming for vents that add up to 15-20 square feet. Your local weather matters, too. In places that are warmer or more humid, you might need even more vent space. Make sure your vents are spaced out well to keep the airflow even.
Fixed vents can’t adjust to changing weather, sometimes leading to too much airflow during harsh conditions or not enough when it’s really hot. With adjustable slats, you can avoid wind damage by directing gusts away from sensitive plants. At night, closing louvers can also keep heat in, improving insulation. The Liberty Automatic Louver Opener offers a smart solution for greenhouse ventilation, using solar power to open and close louver windows automatically in response to temperature changes. You can set it to activate at temperatures ranging from 60°F to 77°F.
In a greenhouse heated by the sun, warm air rises to the top, making it essential to have roof vents located at the highest interior point. Positioning vents at the top helps cool the greenhouse without exposing the plants to cold drafts. Bring fresh air into your greenhouse with Dayton’s 20″ Wall Shutter/ Backdraft Damper/Wall Vent, perfect for passive ventilation. When used with an exhaust fan, it pulls air in efficiently. Ceiling vents at the top let out warm air, while side vents closer to the ground pull in fresh air, creating a vital exchange that keeps both temperature and oxygen levels balanced. Close some side vents at night to contain interior warmth, and keep roof vents open to allow slight venting of rising warm air.
Automated control and other tools
Technological advancements have enabled control of the environment inside a greenhouse using automated systems. These systems measure temperature and humidity levels and compare them to what’s ideal for plant growth. Operating around the clock, this precise control reduces the need to rely solely on natural airflow, ensuring stable temperatures and humidity even during extreme weather. The Aluminum Shutter complements this system perfectly.
To ensure the best airflow, roof vents should be placed along the top ridge, and side vents at bench level to maximize air contact with plants. Place vents on opposite sides to promote a gentle cross breeze. For the best cooling on hot days, consider open-roof designs or shade solutions that maintain airflow while reducing heat load. Retractable shade screens and curtains can also help manage temperature and light, with the option of automated curtains linked to environmental controls.
Seasonal strategies
The ventilation needs of your greenhouse change with the seasons, as do the heating and cooling requirements. What works for keeping temperatures and humidity levels perfect in the summer could cause your plants to overheat in the spring and fall. To keep the inside of your greenhouse just right, adjust how you ventilate and the settings on your vents as the seasons change. In the summer, you might open more roof vents and use additional fans to keep things cool. Before you turn on your automated ventilation system, think about using natural airflow as a way to save money. Simply opening up vents, doors, and windows to let the breeze flow through can provide effective passive ventilation at no cost.
To ensure your greenhouse’s ventilation system keeps running smoothly, regularly inspect and upkeep parts such as vents, louvers, shutters, and fans. You’ll also need to recalibrate the sensors on your automated controllers annually to guarantee they’re providing accurate measurements. Adding retractable shade screens and curtains to your greenhouse’s roof and walls offers an extra way to manage the climate inside. The Lockknit Shade Fabric Kit offers a budget-friendly solution for greenhouse shading. This lightweight and easy-to-handle kit reduces temperatures up to 15°F, blocking infrared sun rays.
Ventilation options and components
The Schaefer Greenhouse Vent System is designed specifically for the humid conditions of a greenhouse. Made with durable materials like aluminum, stainless steel, and PVC, it’s built to last. The Bayliss MK7 Orchid Solar Vent Opener for tropical greenhouses allows your greenhouse to become approximately 10°F warmer before opening the vent. With a triple-spring design, it works on wall or roof vents, providing efficient temperature control. The Aluminum Shutter complements this system perfectly.
Think about passive and active combinations: consider passive vent openers, solar-powered vents, and automated louvers controlled by a thermostat. For the best airflow, roof vents should be aligned with the wind direction to maximize the natural vacuum effect, while side vents provide fresh air at plant level. If you plan to use fans, place them so that air moves over the plant canopy rather than under benches, ensuring uniform temperature distribution.
Maintenance and practical tips
Regular maintenance of the ventilation system is essential. Motorized vent controllers should be cleaned and lubricated several times a year. A wind sensor can help close vents as strong winds approach. Regularly recalibrate sensors and verify that louvers and dampers operate smoothly. Consider insulating shutters on vents and automatic louvers to cut down on cold air coming in when it’s chilly outside. The goal is consistent air exchange with minimal energy waste.
Fixed shading or curtains can be used to manage heat gain during peak sun, while evaporative cooling (fan and pad or fog systems) can provide substantial cooling when humidity is favorable. Remember that a larger system with variable speed or multiple stages can offer better control and energy efficiency than a single-stage setup. Evaporative cooling works best when outside humidity is low, reducing indoor temperatures by up to 10-20°F below outside temperatures.
How to size and choose components
Fan sizing is crucial: the system should provide one air volume exchange per minute to a height of 8 feet for summer ventilation. This ensures good air movement and avoids overheating. In practice, a 25-by-96-foot greenhouse would require roughly 19,200 cubic feet per minute of fan capacity. Consider two-speed fans or multi-fan installations to accommodate seasonal changes. Choose fans with AMCA-tested performance and a good Ventilating Efficiency Ratio (VER) for energy efficiency.
Intake louvers should be at least 1 1/4 times the fan area to maintain adequate airflow. Locate the fan so air flows over the canopy and not directly onto benches. Thermostats and sensors should be placed at plant height for accurate readings. Regular cleaning of blades and removal of obstructions around shutters will maintain airflow efficiency. If you anticipate power outages or failures, consider alarms and backup plans to maintain safe and stable conditions for your plants.
Practical examples and success factors
Natural ventilation concepts have evolved from early venting methods to modern open-roof designs and horizontal airflow strategies. The shift toward taller greenhouses helps move hot air higher above the plants, improving cooling efficiency. Open-roof and side-vent combinations can provide effective cooling with modest energy use, especially when paired with shading and evaporative cooling on hot days. The goal is to balance temperature, humidity, and carbon dioxide delivery to optimize photosynthesis and growth.
tags: #greenhouse #ventilation #ideas