Repotting orchids is vital to their long-term survival and their ability to bloom. The goal when repotting is to choose a correctly sized pot, and replace the old potting medium with new, while avoiding harm to the roots. Bark lasts longer and drains better, making it a reliable choice for many orchids.
Why repot and when
The ideal time to repot your orchid is before the current potting medium begins to break down, and when new roots are emerging that have not yet attached to the old potting medium. Orchids adjust to a new pot and potting medium very quickly when they have new roots to push into the medium and take hold. If repotting is already long overdue, it is better to do it than to wait for new root growth, especially since repotting often stimulates orchids to grow new roots.
Set up and preparation
Before you begin repotting, prepare a table with newspaper, or another means of keeping the mess contained. If you are repotting your orchid in bark, estimate how much you need and rinse it thoroughly prior to use. If you’re repotting with sphagnum moss, wet it slightly until it is moist, pliable, and fluffy. If your sphagnum moss feels heavy and soggy, squeeze out excess water prior to use.
Removing the orchid from its old pot
If the pot is made from a flexible material like plastic, give it a slight squeeze around the outer walls to help loosen the medium and roots. Orchid roots release more readily from smooth surfaces like plastic and glazed ceramic. If the pot is rigid and porous, as in the case of terracotta, wet the roots, the potting medium, and the ceramic itself before attempting to remove your orchid. Hydrated orchid roots are more flexible, and release more easily from the sides of a terracotta pot. Sliding a smooth, thin object like a plant ID tag along the inside of the pot can help part orchid roots from the clay. When you are ready, angle the top of the pot downward toward the newspaper, and gently pull to release your orchid from the pot.
Preparing roots
Examine the roots. Hollow or mushy roots should be trimmed off and discarded; roots that feel firm are alive. Rinse off any dust or potting material that remains attached to the roots; once wet, the roots will be easier to work with, and less likely to crack or break.
Choosing the right pot size
Once the roots are cleaned up, choose a replacement pot based on the size of your orchid’s root system. If your orchid’s root mass increased in size during its time in the previous pot, choose a new pot that is an inch or half-inch larger. At most, we only want to accommodate another year or two of growth. Orchids require ample oxygen at the roots, which is better served by pots smaller than you would use for terrestrial houseplants. If your orchid’s root system has remained roughly the same size, you may continue growing it in the same size pot. If you’re unsure which size pot to choose, a good ratio of orchid roots to potting medium is 50:50. Pots too large have too much potting medium, which cannot exchange oxygen sufficiently, resulting in a soggy, stagnant medium that causes root loss and disease.
Repotting orchids in bark
If your orchid has roots longer than the pot is deep, you may need to gently turn your orchid (in a loose corkscrew fashion) to fit the roots as it descends toward the pot. Roots may kink or crack as you tuck them in, but it won’t cause lasting harm. When repotting your orchid into new bark, add the medium to the pot while holding your orchid in place. When you’re finished, the base of your orchid should be roughly flush with or slightly above the potting medium. A small portion of the roots where they emerge from the base of your orchid will likely be visible once you’re done repotting, which is normal. As you fill in the space around the roots with bark, tap the sides of the pot, or shake it gently while supporting the orchid to help settle the bark in place. Once the pot is full of bark, check to see if your orchid is stable. Orchids that are loose, or wobbly in their pots tend to languish. If your orchid doesn’t seem anchored in place, press gently but firmly on the bark at the top of the pot, which will lodge it against the medium beneath, and the walls of the pot, creating more stability.
Repotting orchids in moss
Begin by lightly wrapping moist sphagnum moss around the roots of your orchid until you have a mass of moss that will fill the pot. Wrapping the roots in moss before placing your orchid in its pot will ensure there aren’t empty spaces in the bottom of the pot; it also snugs your orchid in its new pot, providing stability. You may need to add or remove sphagnum moss before your orchid slots into the pot correctly. You want it snug, but it shouldn’t be so tight that you have to force the sphagnum-wrapped roots into the pot.
After repotting
Repotted orchids benefit from a period of adjustment to their new pot. Withhold water from your freshly repotted orchid for 3 to 5 days. Since you rinsed the bark, or hydrated the sphagnum moss prior to repotting, there will be sufficient moisture in the medium for this brief rest period.
Spiking, budding and blooming considerations
When possible, refrain from repotting orchids that are in bloom, spiking, or in bud. Orchids that are spiking, or “in-spike” are in the process of developing the stems that carry the flowers. Orchids with open flowers are referred to as “flowering,” or “in bloom.” Repotting can be a short-term hardship for your orchid, depending on its condition when you repot it. If your orchid is already devoting energy to the growth of spikes, buds, or to sustaining open flowers, it may have little energy to spare. Repotting orchids during such an energy-demanding period can pose enough strain that flowers, buds, or inflorescences stall or fail. If your orchid is in drastic need of repotting and happens to be in spike, in bud, or flowering, follow the repotting process described above. Carefully clean away the old potting medium, remove dead roots, and take extra care to avoid damaging healthy roots. Orchids that are spiking, or that have small buds forming are more tolerant of repotting than orchids with large buds, or open flowers. Large buds and open flowers are at far greater risk of wilting and falling off after repotting. If you repot a spiking, budding, or flowering orchid and discover significant root loss, or other evidence of distress, you may wish to take an entirely different approach. Regardless of the problem, you may wish to remove the flower spikes from your orchid so it can redirect energy to survival.
General tips and notes
Most orchids are epiphytes and grow on the branches of trees in their native habitat. Commercial growers use sphagnum moss to ensure the plants don’t dry out during shipping and while sitting on retail shelves. It is best to use a bark mix when repotting your orchid. Bark mixes can contain charcoal, sponge rock, and Monterey pine bark or fir bark. Some blends also contain lime or fertilizer. If your orchid is potted in sphagnum moss, you will want to repot it once it has finished flowering. If your orchid is potted in a bark mix, you will want to repot your orchid when tiny fragments of the media are flushed from the pot while watering. Bark potting media needs to be replaced about every two years. The best time to repot your orchid is in the late winter or early spring once new root growth is visible in the plant. The pot should be just large enough to contain the orchid’s root system. Dead roots will need to be trimmed before repotting. Premoisten your potting mix to remove any tiny fragments of the mix. Then, fill the bottom quarter of your pot with the largest bark pieces. Next, you will place the orchid in the pot. Be sure to keep the crown lifted as you add the mix. Press the new media firmly down with your thumbs but be careful not to use too much pressure. Too much force can pulverize the sponge rock and increase moisture retention in the potting mix. Once your orchid is potted up, water it copiously.
Note: Bark mixes should be chosen with drainage and aeration in mind, and some blends contain additional components like charcoal or lime. In practice, many hobbyists prefer bark for its longevity and drainage, while sphagnum moss is valued for moisture retention and antifungal properties, though it requires more frequent repotting. For Phalaenopsis and other common orchids, bark-based media are a reliable default, with final choice depending on climate and moisture needs.
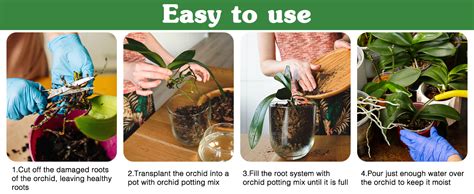
If you’d rather watch, a video can complement these steps by showing the exact motions of gently lifting the plant and placing it into fresh bark.
Why Your Orchid is Dying After Repotting Into Bark (and it's NOT because they don't like repotting)
In summary, the best practice is to repot when new roots appear, use appropriately sized pots, and choose bark for its drainage, or moss for its water retention, depending on the orchid’s needs and climate characteristics.