Preparing To Build A Greenhouse! I should begin by stating that in the planning stages we took all city bylaws and building codes into consideration. I highly recommend you go through this process with your own city bylaws so you don't get any nasty surprises later when your greenhouse structure is already built! With bylaws considered, we also built the greenhouse a few feet away from the fence so that we could easily get the lawn mower around it. Try and think of all the possible variables before you commit to a location. My goal was to keep costs down. I knew lumber was going to rack up quickly, so any materials I could source for cheap was a must! Look for deals and be patient in this process!
The first thing we did was mark off the dimensions of the 8’ x 12’ greenhouse. We put stakes in the ground and added string to help see this frame. The goal was to level the ground. The land was quite sloped, so we had to remove a lot of dirt from the back and add it to the front . Levelling the ground was NOT fun but it’s really important to get this right because it will impact EVERYTHING in your greenhouse build. You may need to remove dirt or add dirt - but you keep working until the ground is level. Once the ground was level, what we should have done was place our 6 deck blocks in each corner and sides of our frame. Originally, we planned to have a small step up into our greenhouse but upon seeing it, it made more sense to have the greenhouse be level with the ground. In the video diary, you’ll see us add the blocks later but what we should have done (which we ended up doing later and it was a terribly messy process), was recess the blocks into the dirt so that the tops were flush with the ground.
Should a greenhouse have a raised floor? Honestly, it’s your choice! You can build your structure on top of the ground, you can build a wood floor, or build it on a more permanent structure like concrete! The foundation of your greenhouse can vary based on personal choice and local bylaw restrictions - make sure you do your research for your area. The choice is yours but regardless, the preparation is all the same! For our greenhouse, I wanted the feel of a finished structure (a tiny home vibe), so we decided to build a raised wood floor. Whether you want your base built directly on the ground or a deck floor, you’ll want to make sure the ground is prepared so no weeds or grass can grow through. To do that, you’ll need landscape fabric.
Now that our 8x12 area was levelled and tamped, it was time to lay our the landscape fabric. Landscape fabric is a perforated material (it feels like a thin tarp or plastic sheeting) that allows water and moisture to reach the soil but stops any weeds/grass from growing through. On top of the landscape fabric, we added limestone screening. My Dad used his lift trailer to drop the limestone on top of the fabric and serve as our base layer. You can also use a shovel for this process but why do that when you’ve got a fancy trailer? We spread it around to cover the entire 8x12 area. You can use different materials for your base such as pea gravel or concrete but we chose a thin layer of limestone because it’s super strong but porous, which means it has good drainage. Also, my dad already had some he was willing to give me! In the video diary, this is when we placed our corner deck blocks on top of paver stones - if you want to step up into your greenhouse, this option is totally fine. But I realized after that we wanted it level with the ground. So, make sure you are sure about your plan ahead of time! Sigh.
How To Build A Wood floor On Top Of Deck Blocks: Whether your blocks are recessed or elevated on top of paver stones, the next step is all the same. We added (6) 4x4 pressure treated cedar posts into the deck block cavities, and secured them in place with (2) 12' x 6” x 2” and (2) 8' x 6” x 2” pressure treated lumber. As we secured each post, we made sure to level them to ensure they were straight. If you’re looking for more step-by-step detailed instructions (with materials) I have a full step-by-step guide you can purchase here! Not related to the base, but we did the same thing at the top, this time using 2x4 PT instead. Inside the frame, we secured (8) 8' x 6” x 2” floor joists, which was a breeze with two people! To make it into a proper looking floor, we added (17) 6” x 12” deck boards using a ½” thick screwdriver at each end and between each board for consistent spacing.
BUILDING OUR GENERAL ROOF STRUCTURE: Now that the floor was finished (yay!), it was time to build our roof! We needed to add our ridge beam. This is basically the spine of the roof. To figure out where exactly it needed to go, we had to know the height of the roof (aka the ROOF PEAK). I knew I wanted to frame a stain glass window over my door, so I placed the window on the ground, added 2x4s around it and measured from the bottom middle of the window to the top peak of the triangle - this helped me know how tall I needed the roof to be to allow this decorative element. For me, my height was 3ft. We added a 2x4 brace in the middle between the (2) middle 4x4 posts (this got removed later). From there, we put up three placeholder 2x4 beams vertically across the three braces at the top, then secured our ridge beam to that. Once the ridge beam was up, it was time to add the rafters! we cut (15) pieces of 2x4x8 lumber. The top of each rafter was angled to lay flush with the side of our ridge beam. We cut a notch, also known as a bird's mouth, where the rafter will rest on the wall. We Installed 7 rafters per side, spacing each rafter 24 inches apart on center.
For additional support, we utilized 2x4 scraps to construct collar ties that were secured across the left and right rafters. We placed them on every other rafter pair. These ties prevent your rafters from spreading under load. Let’s add the Purlins! Now we had the basic structure of our roof, it was time to add 2x2 pressure-treated purlins. These run the same direction as the ridge beam and support the roof. They are also the part of the structure where we will attach our eventual corrugated plastic rooftop. We installed a total of 4 purlins per side: one at the top, one at the bottom, and two in the middle, spaced 24 inches apart on center.
Adding A Door And Wall Supports: The construction of the walls can be a matter of personal design preference! You might opt for all walls made from windows, or follow my approach with half of the walls crafted from horizontal wood boards and the upper half from reclaimed windows. Whatever you decide, enjoy the process and let your creativity shine! First off, we wanted to add our door. We measured the height of our door. Added an additional 1/2 inch, marked this height inside our front 4x4 posts and secured (1) 2”x4”x8’ horizontally above that marked line. This served as the top of our door frame. The extra 1/2 inch ensured your door had enough clearance to open without hitting the ground. Once this was secured, we removed the lateral support across the front as it wasn’t needed anymore! From there, we measured the width of our door. We marked the center of our 8 ft GH (ie 4 ft), then ceneterd our door on this mark and secured (2) 2x4 posts outside our door measurement and screw them to the base and top plate we previously secured. Quick note: leave an additional 1/4” to 1/2” to ensure the door isn't too tight.
Now that walls were going up, I wanted additional support between each 4x4 post. So I used 2x4 posts to reinforce the structure and provide support for the windows I planned to install later. I placed one between each 4x4 post and two in the back.We decided to make our half walls run 30.5'“ high, which was (6) 1 x 6 x 8 fence boards high for visual balance. Starting at the door frame, I measured my desired height from the base and secure a horizontal 2x4 between each post above this measurement. I then repeated this process around my entire structure! We planned it to be permanent, well built, and able to withstand the extremes of temperature, humidity, and weather a greenhouse must tolerate inside and out for many years. It would be big enough to grow plenty of food, an easy place to work, and adaptable to our changing needs.
In our case, the greenhouse attaches to the south-southwest wall of the house, providing heat transfer and integrated space. The sun shining into the greenhouse warms it quickly, even on a cold day. Opening the connecting door lets heat pour into the house for hours. How much heat? We have a 3000 square foot house. We heat it with four or five cords of wood, which covers about half our heating requirement for the year. The greenhouse, with help from the windows above it, supplies the rest. Wood costs around $250 per cord this year. In addition to food and heat, the quality of air in our house is healthier.
The passageway between the house and greenhouse has a screened door and a solid door. I can think of more good reasons to build a greenhouse onto the side of our home. In addition to gaining food, heat, and fresh air, having a new source of entertainment, and saving on fuel costs, we spent less on materials and labor by building against the side of our home than had we erected a four-sided freestanding greenhouse. The range of skills needed to build a project such as this are very much like those needed to build a house. If you don’t have all of them you could contract out the foundation, wiring, plumbing-whatever mystifies you-but much of it you can do yourself.
The first decision to make is where to attach the greenhouse. If you are building a new house and can orient it as you please and have the greenhouse be a part of the construction process, you are very lucky. The south wall is the most obvious and best location, but if, like our house, the walls do not align perfectly north, south, east, and west you must chose the best you can. We built on the south-southwest wall because it was the longest, had the most exposed foundation, and best exposure to the sun. We discussed the possibility of a wrap-around greenhouse, but decided the slight extra sun exposure and cost did not support it. Your situation may be different. Perhaps a true south-facing corner on a small house would call for a wrap-around. Be aware, it is possible to build a greenhouse that is too big. Look at what you have to work with on the chosen side of your house.
Most homes have one or two windows and perhaps a door on the chosen wall. The lower window wall rests on the masonry foundation wall. After taking all the details into consideration and drawing up your plans, it is time to start the first part of the project, and that is the foundation. You may choose to have a contractor do this job. You need a poured concrete or block wall down below frost line with a good footing. It is a lot of work. I hand dug a ditch four feet down to bedrock and built a concrete block wall from there to two feet above grade and filled all the cores with rebar and concrete. I also embedded threaded lag bolts in some of the block cores for securing the plates of the walls that would be built on top. I added a one-inch layer of Styrofoam board against the outside of the walls plus a dry-laid stone wall against that, as you can see in the pictures. This foundation wall is under all three sides of the greenhouse addition. It isolates the earth inside, holds some heat, and keeps out frost and animals that like to dig tunnels.
While the foundation is being built is the best time to remove the old earth inside the greenhouse footprint and replace it. We had sand as fill around our house foundation when it was built. In the greenhouse footprint, we dug some of that away and left some for a base, then added Jen’s special soil mix on top. If you are using the services of a contractor with an excavator, have them remove the old dirty dirt from the greenhouse floor and pile in fresh, wholesome, plant-friendly soil at this time. This is the time to attend to any utility items that need to be buried. In our case, the main sewer pipe runs from the house through the earth of the greenhouse, through the foundation wall, and out to the septic tank. I had to work around that, but I put it to good use by installing a laundry sink in the greenhouse and hooking the drain into it. The sink has been very useful. I don’t recommend burying wires in the greenhouse, but if you must, be sure they are protected inside some tough metal or plastic pipe.
Okay, the foundation walls are done, the soil is in place, and it is time to build the main structure. Planning the shape of the greenhouse depends largely on the glass you are going to use. In the pictures and drawing you can see the three sections of our addition: the lower window wall resting on and bolted to the foundation wall, the slanted big windows making up most of the ceiling, and the roof that is attached to the house wall. I hate buying new glass. It is expensive and there is so much excellent pre-owned glass available cheap or free for the taking that I look for that first. I used some double-hung, double-glazed windows from my stash for most of the front window wall. They were installed on their sides with the screens in place. They work as windows and vents, plus they lock. Those and two large plate glass panes, all framed with 2x6s, make up our lower window wall.
Next, I partially framed the end walls in order to securely brace the window wall, leaving doors and other details to be added later. This gave me a masonry wall about 5½ feet from bedrock to about 2½ feet above ground and 9½ feet out from the house wall. The next part of this adventure is building the roof. It is actually a narrow deck extending out from the house wall. Mine is about 30 inches wide and runs the length of the greenhouse. This roof deck has a number of advantages. The roof deck must be very sturdy. I framed it with 2x6s and decked it with ¾-inch plywood. It is bolted through the house wall studs every four feet and supported with knee braces every 35 inches. The roof deck keeps heat from escaping at the highest part of the greenhouse. The underside of the roof deck is where I wired some pull chain lights and GFCI outlets. It is a good place to hang potted plants, something for plants to climb on, or possibly even put up a hammock.
I want to take a paragraph or two to let you in on a way to find the best glass ever for a greenhouse. The ones we used are 34″ x 75″ tempered glass. Of all the sizes of tempered glass available, that is the most common because it is used in sliding glass doors and those window walls you often see where people have a view. If you must buy new glass, the 34″ x 75″ dimension is readily available and often the least expensive because more of those are made than other sizes. Use single thickness panes of tempered glass for a greenhouse. Tempered glass is amazing stuff. I have dropped it off a roof, had rocks fall on it, and shaken it like a sheet. Its Achilles Heel is the edge. This is a broad view of the greenhouse during construction. Now let’s deal with those rafters between the lower window wall and the roof deck. I am going to show you a way to build these rafters differently than my originals. Plan the spacing between centerlines of the rafters. My glass was 34 inches wide. I want a 1-inch space between the panes. So it will be 35 inches between the centers of my rafters. Be very accurate about this 35-inch measurement as you build. Here is the difference between my old way and the new improved version. Way back then, I used single 2x6s as rafters. It worked, but not very well. They were too narrow. I recommend you use doubled 2x6s or doubled 2x4s as rafters. You may think more is better and consider using larger sized rafters but don’t. The rafters create a lot of shade early and late in the day so bigger is not better. Doubled 2x6s or doubled 2x4s are strong enough. Of course, use the best quality lumber for these rafters. Cutting the rafters to size takes good carpentry skills. There are angle cuts on each end and the dimensions have to be very accurate. When you double up these rafters, make sure they are securely attached to each other with screws. In fact, use screws for attaching the rafters to the rest of the building too. Screws resist the push and pull of strains on the structure much better than nails, and if something needs changing or fixing later, screws are easier and neater to extract and reuse. Before attaching the rafters, cut a piece of 90# rolled roofing 18 inches wide, and drape it over the whole length of the 2×8 top plate of the lower window wall. This covering will drain rainwater away on the outside and condensation away on the inside. This is an important detail. Without it, rot will develop easily in this area. Before attaching the rafters is also the best time to finish the end walls. Look at the drawing. The end walls are a filled-in version of the cross section of the green house. I framed mine with 2x6s, sheathed the outside with ½-inch plywood and my special split shake siding, installed R19 fiberglass insulation between the studs, stapled a 6 mil vapor barrier over that and attached an inside wall covering of 5/8-inch OSB. All that was built around good, solid, well-fitted, weather-stripped doors with screen doors. I also added 16×16-inch screened vents with solid weather-stripped wooden doors near the ceiling in each end wall. One of the vents has a built-in fan controlled by a temperature sensitive switch that starts the fan when the interior temperature of the greenhouse hits 85 degrees. With insulated end walls and roof deck, a foundation wall with foam board against it, and the house foundation and wall for backing, you have a pretty well-built house addition that can hold heat.
Screw the rafters into place, resting the lower ends on top of the window wall plate covered by 90# roll roofing and attaching the other ends to the face of the roof deck, as shown in the drawing. Make sure the rafters are square with the window wall and the top edge of the roof deck. Over-enthusiasm. Now you have a place to mount all those tempered glass windowpanes. Our greenhouse has fifteen of them. Attach a layer of ice and water shield to the top surface of your rafters. It comes in rolls of various widths. Use the 4-inch-wide stuff. That will give a half-inch overhang on each side for extra protection. I used 90# rolled roofing all those years ago, but that was a primitive time before this new material was available. The ice and water shield is much better. You will need a crosspiece between the rafters...
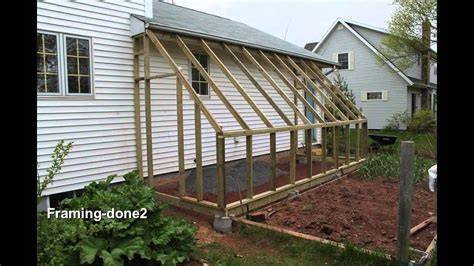
Customizing your lean-to greenhouse: Design considerations transform your gardening experience and extend your growing season with the magic of a lean-to greenhouse. Whether you're a seasoned gardener or a green-thumb novice, the allure of harvesting fresh vegetables year-round or cultivating exotic plants has never been more attainable. With how to build a lean-to greenhouse against a house, you can maximize your space efficiently, attaching a vibrant garden oasis directly to your home. Lean-to or attached greenhouses offer a seamless blend of functionality and aesthetic appeal, making them a perfect addition to any home.
Choose the right structure: Greenhouses come in all shapes, sizes, and materials, which can make any choice overwhelming. The right shape depends on local weather: gabled or pitched roofs shed snow efficiently in snowy regions, while hoop or rounded greenhouses suit warmer climates. The right size should fit your planned use, and the right materials depend on your micro-climate. Rigid polycarbonate panels resist wind better than soft polyethylene, though glass and fiberglass are durable and pricey. Always build greenhouses in sheltered areas.
Pick a good spot: Orient your greenhouse so it faces south or southeast to maximize light, and position it on the quiet side of a building, fence, or hedge row to buffer winds. Remove hazards like falling tree limbs. If possible, test soils at several locations to find fertility and texture. Raised beds are a practical option if soil conditions are poor or contaminated. Consider placing the greenhouse near water for easier irrigation.
Prepare your site: Level the footprint as much as possible. Larger structures may need a foundation, poured concrete, or stacked blocks. A leveled base of gravel provides a mud-free platform for processing or storing equipment. Build the frame with suitable materials, using extra helpers for lifting and alignment. In many cases, kits come with a parts list and instructions; follow them step by step to ensure accuracy and safety.
Cover it up: If using soft plastic, pick a calm day to raise it, and stretch the material tightly over the frame. For glass or rigid panels, follow the manufacturer’s installation instructions. Expect to add weatherproofing, flashing, and sealing to prevent leaks. Plan for ventilation, whether through roof vents, end-wall vents, or moving panels that allow air flow.
Trick it out: Greenhouse kits offer many accessories, from temperature-controlled vents to roll-up sides and trellising systems. If you’re drying kelp or handling delicate crops, tailor the interior with shelves, trellises, and a drainage plan. The key is to adapt existing plans to your space, needs, and climate while keeping the project manageable.
Lean-to specific notes: Lean-to greenhouses maximize space by attaching to an existing wall, providing cost savings and easier access from the house or patio. In colder climates, ensure there is a way for hot air to escape and consider a shade strategy for hot days. Place a door centrally or design access from the patio to optimize reach and workflow. Use energy-efficient glazing and consider insulation strategies to retain heat at night.
Practical tips and examples: Some builders repurpose reclaimed windows and glass for lower costs, while others weld aluminum frames for added strength. Water, power, and heating plans vary by climate; options include trenching water lines, using space heaters, or installing heat storage like black gravel or water barrels to conserve warmth. Tempered glass, if used, offers strength; avoid Low-E glass where possible. When attaching to a house, consider how the greenhouse will interact with the home’s heat and airflow, as this can reduce overall energy consumption and improve comfort inside the home as well.
How to Make a DIY Greenhouse | I Like To Make Stuff
tags: #build #greenhouse #around #house