Striking and functional, this DIY copper trellis will add an artistic flair to your garden while supporting your plants that like to climb. Trellises, by their very nature, are meant to support climbing plants. Although this copper trellis can do just that, it also aspires to do more, all by itself. Whether leaning against a wall or standing erect in a more natural backdrop, the trellis will add verticality to a garden of any style - traditional, modern, or even steampunk.
Assembled using polyurethane glue, this trellis is quite sturdy - especially as an objet d’art versus a plant support - but for those with the equipment and expertise, soldering the trellis’s joints is an option as well. Also, don’t skimp when choosing a tubing cutter to use for the project.
Materials and initial construction
Don’t hurry the pipe cutting. The first step is getting the materials ready, and that means using a pipe cutter to cut the copper pipes to size. Place the pipe between the tool’s cutting wheel and its rollers, so that the cutting wheel hits the pipe where it should be cut. Turn the set screw to put pressure on the pipe. Keep the pressure gentle-too much can crush or crimp the pipe. Rotate the cutter around the pipe twice. This first cut scores the copper. Tighten the set screw a little more, and rotate the cutter twice around the pipe again.
Gently bend the arched pieces to shape. For the curves, I use copper refrigerator coil instead of standard plumbing pipe. It’s softer and bends more easily. It comes in a roll, and I simply uncoil some, measure along the curve and cut off 17 inches. With soft tubing, it’s even more important to make the cuts gently. Don’t straighten out the tubing while measuring or cutting; it may crimp or dent. Once I’ve cut the piece to length, I bend it gently to a shape that is almost a quarter circle.
Clean and flux the pipes, then put them together like Tinkertoys. After cutting the pipes, I use a nylon or metal cleaning pad to scour away any oxide from the ends of the pipe. Then, I don a pair of latex or rubber gloves and set up in a well-ventilated, bright work space to avoid fumes from the solder and flux. Brush a thin coat of soldering flux-a substance that helps create stronger bonds when soldering most metals-onto the end of any pipe that is to fit into a T-shaped, elbow-shaped, or other fitting. I start at the bottom of the trellis, fitting the top end of the four longest pipes into a T-shaped fitting. They should fit neatly. I connect shorter, upright pieces to the opposite side of the fitting, creating a pole about 38 inches long, with the T fitting near the middle and an 18-inch, horizontal bar to link two of the poles into H-shaped assemblies. I place reducer-T fittings at the top corners, and connect the two pieces with the second pair of 18-inch, horizontal crossbars. To help align all the pieces, I mark a 20-inch square on the garage floor, and use it as a guide for the base of the trellis. Because the square top is composed of so many short lengths of pipe joined with so many fittings, it’s easier to work on this piece separately on a flat surface. To make the top, I flux the ends of each pipe and assemble four identical pieces, each with two 3-inch lengths of pipe joined by a T fitting in the middle. Then, using the elbow-shaped fittings, I join the four straight pieces into a square. The stem of each T fitting should face out in order to connect to the four curved pieces that link the square to the rest of the structure. The other end of the curved piece fits onto the small opening of the reducer T fittings on the base.
I usually turn the soldering over to my brother for experience, but I’ve done enough to know soldering takes practice. Wearing safety glasses, he works from the bottom of the trellis up, squaring or straightening each joint before applying solder. He lights the propane torch and starts heating the area he wants to solder. He moves the torch back and forth evenly across the fitting, never aiming it directly at a joint. When the flux starts to bubble, the temperature is just about right. He gives it a little more heat, then touches the solder to the joint; it melts on contact and flows smoothly into place. Any excess is wiped away. Pipes should always be handled with care-they can be very hot, even a foot or two from the fitting. The trick is to work slowly until you get the feel for it. Once the upright and horizontal pieces have been soldered, adjust the curved pieces and the square top. Check by eye to make sure the curved pieces are arranged symmetrically and that the square top is parallel with the ground. After we adjust all the pieces, Terry solders the dome joint by joint, checking to make sure that unsoldered pieces have not shifted.
Stability and finishing touches
I like to let the copper age naturally. Copper structures are easily installed in the garden. I take a 3-foot length of rebar and drive it 18 inches into the ground, then slip the copper pipe over the rebar. That’s all there is to it. With proper installation, the trellis stands stout whether leaning or freestanding, and it can be adjusted to suit your garden’s aesthetic. In addition, copper is corrosion-resistant and retains a warm patina as it ages, which helps the piece blend into outdoor surroundings.
Solid copper pipe or structures are not inherently harmful to plants. Copper is toxic to fungi and bacteria at high concentrations, but a vine growing directly on copper or copper-alloy metal will not be damaged by the contact itself. If you want to be cautious, you can seal the copper with a clear non-glossy varnish before training vines on it. This is optional, not necessary. A sealed surface simply prevents any potential surface corrosion and keeps the metal's appearance.
Plant compatibility and care guidance
Safety reminder: The milky sap on the plant stems can be a skin irritant, so wear gloves when taking cuttings or handling stems. Copper trellises are a great choice for a range of climbing plants, including tropicals and ornamentals, due to their sturdy support and attractive aging. The design in this article also highlights how copper can be used to create visually striking garden elements that enhance both form and function.
When using copper with climbing plants, consider light exposure and plant needs. Mandevilla, for example, is a tender tropical that thrives in bright light and warm conditions and benefits from strong, stable support as it climbs. For seed propagation, pollination, and care strategies, refer to plant-specific guidelines to ensure proper growth and flowering. The trellis helps provide vertical growth space, reduce leggy stems, and guide vines toward optimal light exposure, while the copper surface adds a decorative yet durable structure to the garden.
Additional notes on indoors and other uses
Birdy's Plants notes that trellises are versatile for houseplants as well. Trellises help many indoor climbers grow upright, improve airflow around foliage, and maximize space in small rooms. They can be used with hoya, philodendron, pothos, begonia, and other climbers to shape growth and support heavier vines. Copper trellis options, when used indoors, should be selected with consideration of humidity and plant compatibility; coating or sealing may be used to minimize direct contact with leaves if desired.
Decorative and practical advantages
Copper trellises look fantastic when new and develop a patina over time that glows in outdoor light. This aging process helps the trellis blend with garden surroundings, adding rustic warmth and charm. In addition to aesthetics, copper supports are durable and resistant to corrosion, and copper is fully recyclable, aligning with eco-conscious garden design. The range of shapes and sizes available for copper trellises enables creative customization, from simple straight supports to curved sections and intricate geometric patterns.
Reviews and user experiences show copper trellises can be built with common tools: a pipe cutter, a soldering kit or strong glue, and standard fittings. The approach outlined here emphasizes careful measurement, proper joint alignment, and patience during assembly to ensure a sturdy structure that can train vigorous climbers while serving as a decorative focal point.
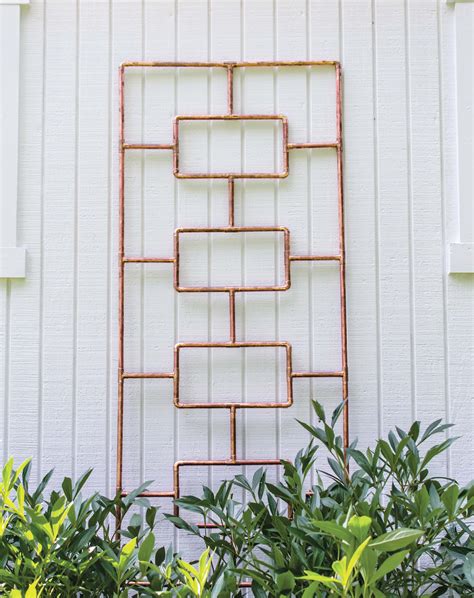
Gorgeous DIY copper garden trellis!
For readers seeking further inspiration, copper plant supports in the garden illustrate how metal can merge utility with art. In summary, a copper trellis offers durable plant support, striking visual appeal, and a versatile design that adapts from traditional gardens to modern or whimsical settings, whether placed against a wall or standing free in the landscape.