Could your outdoor space use a little pick-me-up? Is your patio, deck or dock practically begging for a fresh new look? Don’t worry, we’ve got the perfect solution. With these FREE PLANS, a few lengths of wood, some screws, paint and a little Weekend at the Cottage know-how, we’ll show you how to make our EASY DIY PLANTER BOXES. So, grab a saw, drill, some paints and brushes and prepare to be amazed.
Often thought of as container gardening, planter boxes act as movable garden beds. If Do-It-Yourself is what brought you here, we also have other posts that might be of interest. Make sure to check out our very, as in VERY, popular DIY PINE CONE WREATH complete with VIDEO TUTORIAL. We also recommend this THREE-SEASON ROOM MAKEOVER, especially if you’re looking for decor ideas. Lastly, check out HOW TO BUILD A STORAGE SHED. Thankfully we’ve got the answers to all of those questions and more!
Tools, materials, and safety for beginner builders
We purposely crafted this DIY project using as few tools as possible. You’ll be able to make these boxes using a circular or mitre saw, an electric drill with drill and screwdriver bits, a measuring tape, a square measure, a pencil, wood screws, paint and brushes. If you don’t have some of these tools, borrowing them from a friend is always a good idea. You can also swap out the drill and screws with a hammer and nails too.
Because we want you to enjoy this experience it’s important to mention three additional tool-related points. Number one - safety first; always follow manufacturers’ guidelines on the safe operation of power tools. Number two is to always wear safety glasses, and number three, to avoid frustration, measure twice and cut once.
Plan for 3-foot long planter boxes
Here is the plan for 3-foot long planter boxes. Let’s hear it for free plans! I did a rough sketch of a basic wood planter box and sent it off to some design friends (thanks Abe & Sam!) who then turned it around as PLANS! We invite you to download, print and share.
Couple of things to note: the lower section of the drawing indicates the exact measurements of the seven pieces of wood you’ll need to cut. Notice the dimensions for the longer lengths. Two are used for the long sides of the box while the third acts as the bottom of the planter. This helps keep the construction super straightforward. Although we showed how to make 3-foot long planter boxes in this post, you can also make them smaller or larger to suit your needs. Simply increase or decrease the length of the long sides and bottom to create a 2-foot, 4-foot or 5-foot long planter box. The side lengths and feet stay the same.
Choosing wood and assembly
Two things were top of mind as we planned this DIY project; make it easy but also make it as inexpensive as possible. Our goal was to have the end box cost less than something you might find at a local garden centre. Options for the type of wood to use included MDF (medium-density fibreboard), redwood, cedar and pine. The MDF, redwood and cedar were the most expensive, so we looked at pine. Hats off to the guy at my local building centre who suggested using weather-resistant pine roof planks. One side of these boards has a smooth finish while the other is rough. That unfinished side, normally hidden as the underside of a roof, is what keeps the price of this pine product so low. I figured we could hide the rough side as the interior of the boxes and no one will be the wiser. Don’t be surprised if you make a bunch of these. They make great gifts, too!
Assembling the planter box is easy. Simply butt one of the long pieces up against one of the side pieces and attach them together using 1-inch wood screws. TIP: to avoid cracks in the wood, pre-drill the screw holes. Once the sides and lengths are attached and the four corners are connected, screw the bottom plank into the sides. The next step is to use a 1/2-inch drill bit to add drainage holes to the bottom. We’re then changing the drill back to the screwdriver bit to attach the two feet to the bottom of the box. The feet were purposely cut smaller so that they remain hidden. Hopefully, you’ll follow our lead and give your planter boxes a coat of paint to match your surroundings. Of course, you can leave them as is or add a simple stain finish, but we like the painted look. If you do decide to paint, begin by applying a good coat of durable outdoor primer. As mentioned, select a paint colour to match your surroundings. I went with the same trim colours used both on the shed windows and on the front door of the cottage.
Filling and finishing touches
One of the best moments in this afternoon project is filling your completed box with flowers. We purposefully did not line our boxes with plastic pots or plastic covers; we like a more natural application. Emptying the boxes every fall ensures they’ll be around for years to come. To fill, begin with dirt or a premium potting soil enhanced with compost. After that, adding your favourite annuals is a breeze. When selecting the types of flowers to include, consider things like location and amount of sun.
Talking about fill, I also want you to think outside of the (flower) box. Why not fill them with a collection of assorted herbs? A herb garden is a lovely idea for the at-home chef. Another option is to do vegetables or fruit. Place them out on your front porch, deck, dock or patio to add interest and colour. We’re also thinking they’d make glorious window boxes, too!
Alternative ideas and design notes
There are so many different designs to consider. So if you’ve ever envisioned adding window box flowers to your own shed or even your home to create a pretty focal point with flowers or foliage plants, or perhaps even vegetables, here’s an easy way to build some!
This post contains some affiliate products in which I earn a small percentage from qualifying purchases at no extra cost to you. I only endorse products I love to use. All opinions are my own.
A second approach: modular and economical planters
There are so many ways to build a basic crate or box. It doesn’t really matter the way you choose. The most important part is making it to the size desired. Cut 4 planks that length and assemble with screws, then add drainage and optional trim for a finish. You can also create an entire connected network of boxes using cement blocks and simple wood inserts if space allows. To protect the wood, you can use mineral oil and enjoy a simple, durable finish.
Use these free plans at the end of the post to build a small patio planter box with minimal budget and time. This easy project is perfect for small spaces, apartments, porches, and windowsills. You can scale the plan to different sizes, and build multiple boxes in a modular layout to fit your space.
Practical considerations and maintenance
Before you plant flowers, you’ll want to be aware of whether your plants require full sun or partial shade. Window box planters can hold flowers, plants, herbs or vegetables. When you’re done, test for water needs and consider a paint wash or staining approach to achieve a cohesive look with surrounding structures. Aging new wood can be easy with a light wash that tones the wood to blend with nearby features.
Ready to start
To summarize, these DIY planter boxes are affordable, scalable, and beginner-friendly. They are designed to be easy to assemble with common tools, adaptable in length and width, and capable of hosting a variety of plants-from annuals to herbs, vegetables or fruit. With careful planning, you can create a charming, productive feature on porches, decks, docks or windows, and you can replicate the look across multiple spots for a cohesive outdoor display.
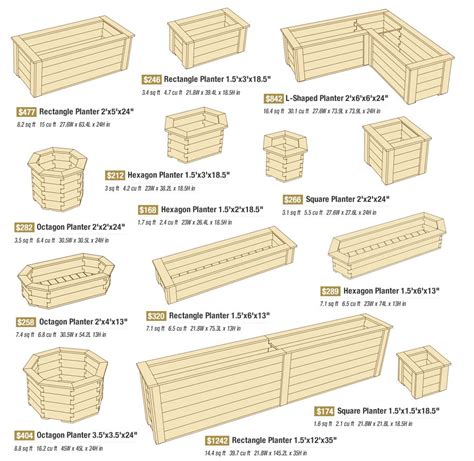
Visualizing spacing and dimensions helps beginners plan their cut list and assembly steps. A simple layout shows long sides, end pieces, and the bottom plank, plus drainage holes.
Easy Cedar Planter Box || FREE PLANS
Short video can illustrate cutting, pre-drilling, assembly, and drainage installation-great for beginners who benefit from watching each step in action.
1. Cut 4 planks for sides of the planter. 2. Cut 4 planks for ends of the planter. 3. Cut runners. 4. Cut supporting pieces. 5. Assemble the box with screws. 6. Drill drainage holes. 7. Attach feet. 8. Paint or stain. 9. Fill with soil and plants. 10. Enjoy your new planter box.