Keep your plants off the ground and healthy. Hortonova Trellis Netting provides the adequate airflow necessary to reduce bacterial and fungal diseases while keeping foliage and fruit away from soil-borne pathogens. Hortonova is engineered from high-quality polypropylene that is UV-resistant and won't degrade in the sun. Unlike metal fencing, this mesh will not rust or rot, and it doesn't harbor diseases from one season to the next.
Why choose trellis netting for vertical and horizontal support
Vertical Support: Ideal for pole beans, cucumbers, and climbing peas. This durable, lightweight polypropylene trellis netting is perfect for supporting vegetables, training stems for cut flowers, and tall vines, allowing more airflow and sunlight to reach the plants. The space-saving 6" mesh net is available in 3', 4', 6' widths.
Horizontal Support (Catenary): Perfect for cut flowers or heavy-fruiting tomatoes. You can also use this trellis net horizontally for long-stem flowers such as dahlias, zinnias, and the like. Keep peas and pole beans supported with horizontal netting. Mesh size approx.
Installation versatility: vertical or horizontal
Netting can be installed both vertically and horizontally depending on the need. To install netting vertically, insert support posts down your rows at approximately every 20'. Next, attach the net to the support posts using string or twine. We suggest that you snake a support cable such as metal wire or other strong cord or string through the netting at the top to support the net. This style of installation is also used for vining crops in the vegetable garden or market farm.
Install garden trellis net horizontally for cut flowers. Use several layers close together. First, start by putting four wood or metal supports into the ground. Install the first two posts at equal width with your netting (i.e. 3' apart, 4' apart, 6' apart). The second set of posts should be installed 6'-20' wider. Next, screw or bolt wooden cross bars between posts 1 and 2, and between posts 3 and 4 at the different heights that you will space your layers of trellis support at. The heights will depend on how tall your plants will grow. Finally, unroll the lightweight polypropylene trellis support netting and attach it to the cross bars between posts 3 and 4. You can continue the row by putting support posts, and cross bars every 20' apart and making the layer as long as you want.
Benefits of Hortonova trellis netting
This UV-stabilized, chemical-resistant netting offers better yields and healthier plants by improving airflow and reducing contact with soil pathogens. It is corrosion-free compared to metal fencing and designed to endure outdoor conditions season after season. The netting is suitable for a range of crops, from vegetables to flowers, and can be used in multiple configurations to fit garden layouts and seasonal needs.
Next steps and considerations: assess crop type, space, and height to choose the appropriate width and layer configuration. Plan vertical or horizontal runs based on plant habit and airflow requirements. Consider integrating multiple layers for cut flowers to maximize production in a compact footprint.
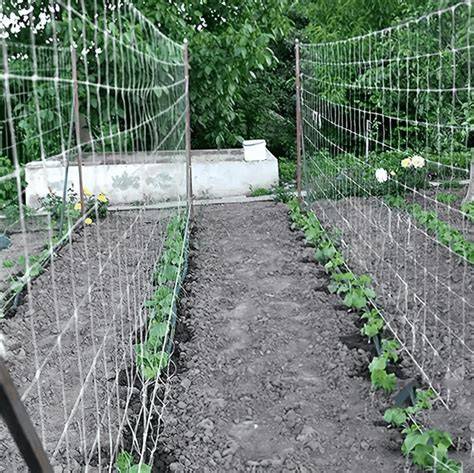
How to Make a Net Trellis || Black Gumbo
- Assess your crop type and growth habit to determine vertical or horizontal orientation.
- Choose the correct width (3', 4', 6') and mesh size (6" mesh) for your space.
- Install vertical netting by placing support posts every ~20' and securing with string and a top cable.
- Install horizontal netting for cut flowers by building layered cross bars and aligning posts.
- Unroll and attach the netting to the cross bars, creating a sturdy, breathable structure.
Want more information about trellis netting?